Release Notes v0.6.34 (Customer Portal, Email Signatures, Sales & Inventory Widgets)
Customer Portal
Your customers get their own place to follow their projects. Builders, contractors and homeowners sign in with a link from their email, with no password, and find the project's photos, drawings and sales orders whenever they want them. That means fewer "can you send that again?" calls and emails for your office.
Documents waiting for their signature sit right at the top, and they sign them there.

You choose which folders customers see. Anything new in those folders shows up for them on its own.
The Portal button on a project shows who from the customer can see it and when they last looked, so you know your update reached them.

Try it with one customer you work with often. Turn it on in Settings > Customer Portal and give them access from their Portal tab.
Emails
Emails you send from the app now end with your signature and photo. Everyone has one already, filled in with your name and company. Add your job title and phone number in Profile > Emailing and watch the live preview as you type. To send an email without it, turn off Include my signature.

Calendars
Tasks that run over several days show as one bar across those days, in week calendars and in the dashboard Schedule widget. Each day's total counts only that day's hours, so a task from Monday noon to Tuesday noon adds 12 hours to each day.

Dashboard
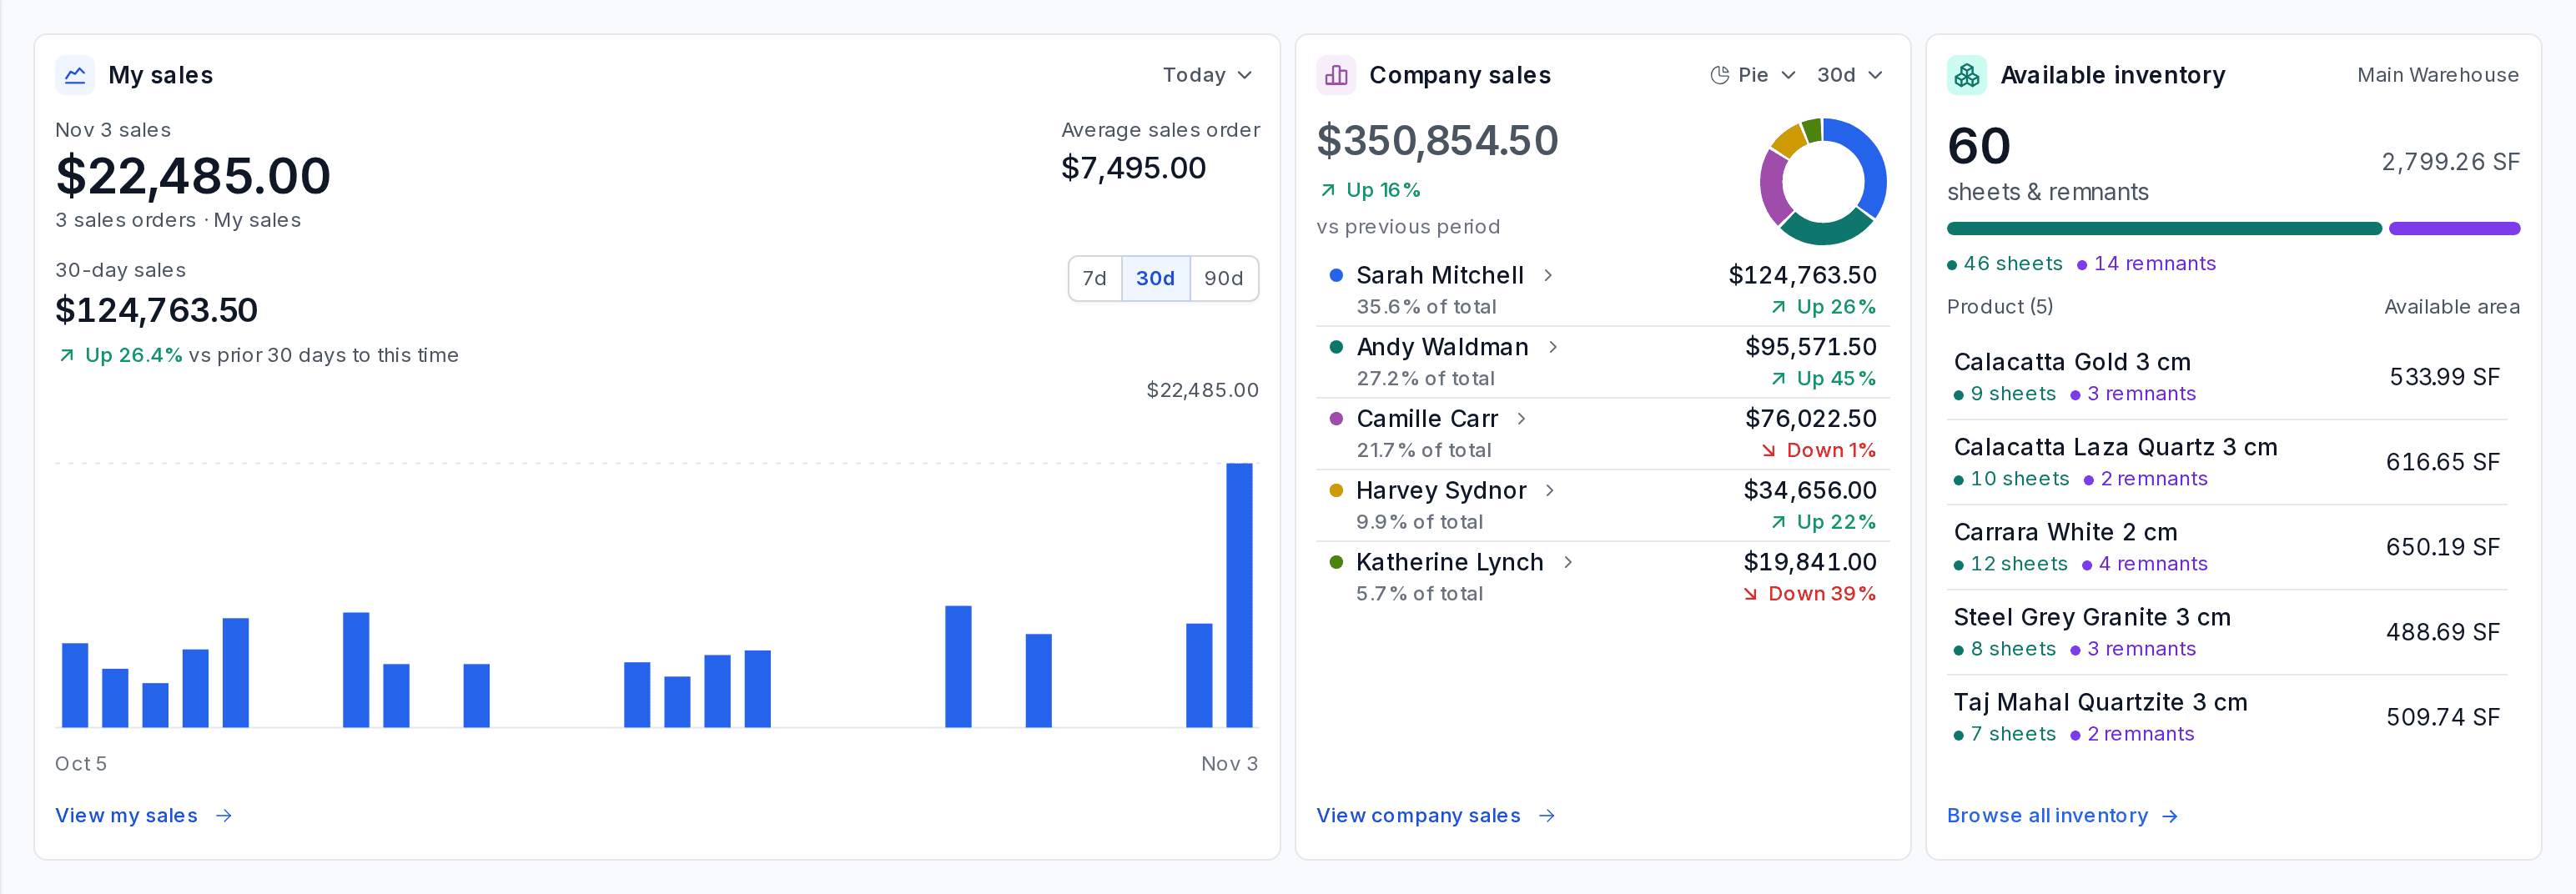
Three new widgets show how sales are going and what you have in stock. Add them with Add widget:
My sales: your sales orders for the day and your average sales order.
Company sales: sales for a period, by primary sales owner.
Available inventory: what's available, by product and warehouse.
Nobody sees the new widgets at first. Someone with Manage Shared Dashboards gives access with Manage widget permissions.
Drawing
Drawings open with shapes colored by package, so you can see at a glance what belongs where. If you'd rather not, turn off Show package colors and the app remembers your choice.
Pricing
Not sure how a price was put together? How pricing works walks you through it step by step: the starting price, then modifiers, special prices and discounts, with examples you can try. Click the light bulb next to selling prices, pricing tiers, discounts or price groups, then How pricing works.

Warehouse App
The Fabrication App is now part of the Warehouse App, so your warehouse and your shop work in one app. Scan an item and you see what you can do with it, such as transfer, allocate or make a remnant. Everyone keeps the permissions they have today.
Logistics
Download the Logistics schedule to Excel with Export. It keeps your current filters, so you get the same list you're looking at, ready for your own reports.
Purchase Orders
Shipments have a Container number next to the BOL number. Carriers come from a list that already has the major ocean carriers and parcel services, and you can add your own in Settings > Inventory > Carriers.
Printed purchase orders can show each item's Alternative description. Tick it under Visible Columns for the Purchase Order Items table in the document template.
Live Inventory
You can show customers every color you sell, including the ones you order as needed, like most quartz. Turn off No Availability Text in Settings > Inventory > Live Inventory Settings, and those colors appear without an out-of-stock message next to them.
Finance
Pick the bank account each customer's payments go into, and Deposit To is filled in for you whenever you record a payment. Set it on the customer's Payment Information card, or for a whole project type in Settings > Projects > General > Manage Configs. You need the Set Default Deposit Accounts permission.
Each project type can also have its own invoice, credit memo, deposit and refund templates, so every document comes out right for that kind of work. Choose them in the same Manage Configs window.
When you compare periods in Profit & Loss, the Excel export has the comparison too, with the same change columns you see on screen.
Horus
Remnants come over from Horus more reliably: the automatic remnant sync picks up every change Horus records. Each remnant arrives with its real shape and area, not the rectangle around it.
Photos taken in Horus can come over on their own. Add Horus photo sync in Settings > Automatic Jobs, and it puts Horus photos on your slabs and remnants that don't have one yet.
Slabs you receive can go to Horus without typing them in again. Use Add to Horus on the goods receipt or in a slab's menu, or Add Slabs to Horus in the Horus menu on the Inventory page.
One window shows which slabs differ between the app and Horus, and you can fix their status in Horus from there. Open Compare Status in the Horus menu on the Inventory page, or Compare with Horus in a slab's menu. You need the Manage Inventory permission.
Data Import
The Products and Services import can set a price per tier for each SKU, for example a higher price for 3 cm than for 2 cm. An optional PriceModifiers sheet adds option surcharges. The templates are in Settings > Data Import > General Imports.
AI Connectors
A connected AI assistant such as Claude can now help with purchasing and stock. It can:
look up suppliers, vendors, purchase orders, bills and stock
create purchase orders and record deliveries as draft receipts
enter vendor bills, after showing you the journal entry
add and update vendors and suppliers
Each of these needs the same permission as the screen it comes from. To give an existing connector the new abilities, open Settings > AI Connectors > Active and choose Edit tools in its menu. Only the connector's owner can change it, and there's no need to reconnect.